Wednesday 14 November 2018

RL13's New Home

All change!

Not just for the Zero - I moved too, headed west to Monmouthshire in Wales, an attempt to explore a different area of the UK. We moved in last week, today was the road trip back to my parents house to pick up the car.

The promise of some excellent drives with Sugar Loaf and the Black Mountains in the distance.

No small part of the new house requirements was a larger garage space, 6m x 6m, half filled with removals boxes for now, but plenty of room to work on RL13.

After around 180 miles arrived in Wales around 17:30 making excellent time.
Some work to do on the driveway which is a little steep but nothing insurmountable.

Update 9/12 - Driveway sorted, concrete step removed, no excuses now!

Tuesday 25 September 2018

Tea and Cakes at GBS

On Saturday GBS ran one of their regular open day/meet up at the factory with Tea, coffee and cakes on tap and a chance to see other cars and builders and for anyone interested to take a look.

I've not done a big road trip this year, weather looked reasonable with a 10% chance of rain and just over 10ÂșC temps, so decided to go. Its around 175 miles each way, good weather going north and made good time arriving soon after 11:00. 

Excellent turn out, the carpark full, immediately met up with Graham who built a Zero in Germany, and then lots of people who were either building at the same time as me, some who had referenced my build and others I've only met online on the Facebook Zero enthusiasts page


The more recent Zeros tend to be painted, or wrapped, plenty of variation in finish and options - Its still a case of each builder producing their own unique motor.


 Credit for some of these photo's goes to other attendees and enthusiasts.

The trip home was more eventful, after a short dash to Worksop and back to see Kevin's build and more welcome tea, the rain set in - by the time I was half way home I was driving in heavy rain and absolutely soaked!

Some of the passing drivers now chuckling with pity at my bedraggled state, as well as the usual waves and thumbs up.

Sunday was spent soaking up/wringing out what must have been at least a litre of water from the drivers footwell. Interestingly much more on the drivers side than passenger - whether that was water bouncing off me or just more puddles/standing water on my side I don't know.

Currently the car is sitting in the sun making sure everything is bone dry.

~300 miles round trip, enjoyed that!

Wednesday 5 September 2018

300,007 Total Views

March 2012 to September 2018, 560 posts, half a dozen major road trips in the UK and across Europe, 26 odd thousand miles and 300 thousand page views.
Modest granted it averages around 100 hits a day, and some of those are me using the blog as a manual. At the same time some scrapbook to look back on.


It's not just a car not even a hobby - its a lifestyle - and the best investment I've made in years. Don't buy the doors and roof - its all about the wind, rain and sunburn!


Happy driving and thank you to everyone who has dropped in.

With a little luck I may even manage a double garage before the year is out.

Sunday 1 July 2018

Rear springs uprated to 275lbs/inch but...

My experiment was to uprate the rear spring poundage from stock 250lbs/inc to 275lbs/inch and see if it stopped floorpan scraping without any negative side effects.

However, I didn't double check the size and trusted the Protech website spec. I failed to take a note of the size when originally building or prior to ordering - so sods law meant I managed to buy short rear springs.
I have now confirmed the correct rear spring spec on a Ford Zero is 8"x250lbs. 1.9" ID.

The 7" tall springs are just long enough to give me 125mm sill clearance - could do with another 5mm (I run 130mm rear, 120mm front). The risk is I'm compressing the flex out of the springs just for ride height and losing travel/risk binding the coils when driving.
The ride is excellent, could well be placebo of course, on the other hand everything feels tighter in the rear end, still some cushion, but a firmer feel like the rear end is glued to the deck.

The 275lbs is definitely staying. Heavy me + boot mounted spare wheel etc needs that little extra, added firmness without being harsh. The 275 vs 250 is extra loading on the suspension mounts - but my crude thinking is if the fronts can take 350 then the rears should survive - only time will tell.

Test run across Romney Marsh on a summer evening was glorious!

Update - 8" x 275lbs ordered and fitted
Anyone in the market for the 7x275s when they come off drop me a line.

Friday 15 June 2018

Protech front shocks upgrade

On the way back from Vienna my nearside front shock absorber developed a fault - no dampening at all. The suspension happily bouncing the wheel rather than hugging the surface.

Two options:
1. Reasonable repair by Gaz to re-build the bad shock, probably should do both fronts though. ~£50 each by the time I add return postage on to their fee.
2. Replace both fronts with something new. Say more like £100 per shock, but also lets me do a little like for like comparison between components.

I chose the latter.
I hadn't recorded the part numbers on original build, and not taking anything for granted measured up and verified the spec with a very responsive Protech before ordering.

Fronts as per Protech's standard Zero spec, certainly slimmer than the Gaz's and felt significantly lighter although I didn't weigh them. I'm thinking about some DIY covers/boots for them, although the Gaz' looks haven't faired too badly for 5 years in the elements.

No problem fitting, around an hour to do both, wheels stay on, new nylocs and an extra spacing washers on the top ends. Stock 350lbs springs re-used. Aligned on ~120mm above the deck. 10mm higher than standard GBS settings to try and avoid road humps.

Need some testing - then perhaps up-rate the rear springs from 250 to 275lbs to see if that reduces the tendancy to wear away the seat bolts on bumpier roads.

Update - one short spin later, shocks set at +2 clicks, +3 is ok but a little hard for bumpy roads.

Tuesday 5 June 2018

Brake fluid change

5 years in, brake fluid has a life of somewhere near 2-3 years depending on how much water it absorbs - so overdue for a change.

This little gadget for ~£5 from Ebay was indicating between 2% and 3% water when dipped in the reservoir. Off the scale when dipped in the extracted fluid.

My Gunson Eezibleed was broken out of storage and used to push out the majority of the old fluid (without introducing air to the brake lines) then push in new fluid behind it. It uses pressure from one tyre rather than the traditional two man synchronised brake pedal/bleed nipple approach.

Bleed through each calipper, starting furthest from the brake cylinder, until the fluid ran clear. Of course one bleed nipple was stuck - offside rear - where I had least working space in the garage but a little WD40 loosened it.

Pictured:  ~0.5 litres of old darker removed fluid (left), vs new clear fluid.

Brake pedal feels hard enough, subject to a test run we should be good for another few years.

Note to self - add double garage with a recess in the floor for a scissor jack to the wish-list.

Thursday 10 May 2018

MOT 2018 - Pass

MOT day again, and a PASS with no advisories.

Thank you to Tom at Staplehurst Tyres for running the test, and letting me take a few pictures while he worked.

Pre-test check on emissions - just to see if I would need any map adjustment. All fine - fast idle locked into 1.01 lambda, HCs 0ppm and CO 0.0%. Perfect, we also checked and adjusted my new headlight bulbs and lens alignment with the test station kit.


Then on with the test proper! 

...chance to see under the car without laying on my back - all looks fine.

My usual slow drips from the diff front end (diff is topped up annually), engine rear seal (negligible - oil change is always 5 litres out, 5 litres in) and a new ooze from the oil take-up filter access bolt on the front of the sump. It looks like this last one is because the crush washer has split - no issue for MOT, but I'll remove, clean and replace the washer when I change the oil.


Brakes pretty even, rears heavier on the offside but within tolerance. Tyres wearing evenly.

All passed and legal for year #6 on the road!
Fantastic.


A reminder for me - last MOT I was discussing with Tom an idea some yellow markers on the underside to show jacking points, apparently Lotus Elise's do something similar - never got around to painting them on!

Saturday 28 April 2018

Stoneleigh - Zero owners area

Stoneleigh National Kit Car Show is next weekend over the bank holiday: Sunday 6th and Monday 7th May. Provided the weather is anywhere near decent I'm intending to go on one of the days - probably Sunday.

GBS has organised a Zero owners parking area in pitch #29 near entrance 2. The show is free entrance any driver attending in a kit car so no reason not to have a look around. It's always interesting to see the variations in cars - even if they are based on the same underlying kit.


Update - Sunday 6th May - Weather looks fantastic, dry and sunny, highs of 22ÂșC, I should get there around lunchtime. Around a dozen or so cars when I arrived lunchtime in area #29.

Monday 16 April 2018

GN13 is no more...

The number plate isn't anyway.

A little present to mark the car's 5th year on the road: My initials, keep the lucky thirteen and...


GN13GWK is dead, long live the FUN!


Note to self 5 years ago - don't stick number plates on with Sikaflex if you ever want to remove them in one piece!

Sunday 15 April 2018

AFR Corrections - 1% of 21 is less than one

Penny drops.

My previous MO had been to periodically review the AFR Corrections values - % applied to injection, and apply those en-mass to the injection map. Especially when I'd been tinkering with some part of the map, axis ranges etc and getting more corrections.

But

The injection map has values ranging from ~20 - ~170, whole numbers with a maximum of 255. One byte, 8 bits per value.

If I apply a typical two decimal place -1.05% or +0.76% AFR adjustment to an injection cell containing ~20 even ~30 then the net effect is no change. My AFR adjustment is zero'd and effectively ignored. I've been discarding the bulk of fine adjustments every time I apply AFR corrections!

My guess is the Emerald ECU internally is multiplying the Injection table value by the MSPB value into say a higher precision 16 bit floating or fixed point result, then applying any AFR and other Adjustments as percentages to that before scaling to the ECU clock or interrupt frequency to fire the injectors.

So

New procedure will be:
   1. Review the AFR adjustments: apply and zero anything larger than + or - ~2.5%, 
   2. Leave anything smaller on the AFR adjustments table,
   3. Periodically run the result through the smoothing spreadsheet masking off any cells with an AFR adjustment.

If that procedure written in the manual somewhere and I missed it - just shows sometimes I need to learn the hard way! In this example, after a test drive through Kent, Green boxes showing areas to apply, red those to leave on the corrections table.


I do want to apply the large AFR adjustments - once they hit the current max +-15% threshold, applying them to the injection table will allow the Wideband to keep honing the map on the next cycle.

MSPB Milliseconds per bit

I scaled the entire Injection map using additional maps->injection scaling for a maximum 255. My map has some low rpm anti stall peaks which are always going to be the highest point so they may as well be 255 and increase the available bit range for other cells.

This automatically re-calculated my MSPB to 70ms from the default 100ms giving me a little more fine grained adjustment on the low TPS position cells i.e. minimum adjustment of 1 part in ~30 rather than 1 in ~20. 

The ECU is fascinating, especially when I get a little understanding born out in real world experiment.

Tuesday 10 April 2018

2018 Calendar from California

Garage enhancement in the form of a calendar to replace the Pirelli one,

Designed and supplied by B&B Industrial Hardware & Metals in California. Kindly sent to the UK by Marlin, A fellow GBS Zero builder stateside. Made me laugh (perhaps nervously) when it turned up unexpectedly, I thought, and told my wife, the package was vinyl wrap.

April is Ms. Katrina Santos.

Just doing my bit to keep the UK/US special relationship alive and well, and keep a car workshop cliche going!

Offer
I have a second one and happy to forward on to a UK postal address - drop me an email if you are interested.

Sunday 8 April 2018

Injection table smoothing

My Wideband automatically adjusts the injection table based on the mixture sniffed from the exhaust. 

In an ideal world I'd run all combinations of Throttle position (TPS) vs. Revs to completely map the engine - exactly what a rolling road does - in real world road driving you get specific feedback points here and there peaks and troughs of mixture adjustment.

So, a little desktop work with a spreadsheet - the intention being to take the injection map as an input, apply a smoothing algorithm without being too destructive and produce the next iteration of the injection map.

Parameters

My spreadsheet implements a simple algorithm taking into account each injection cell's neighbours/adjacent cells. Its just averaging each TPS/RPM point to be somewhere in the middle of its neighbours.

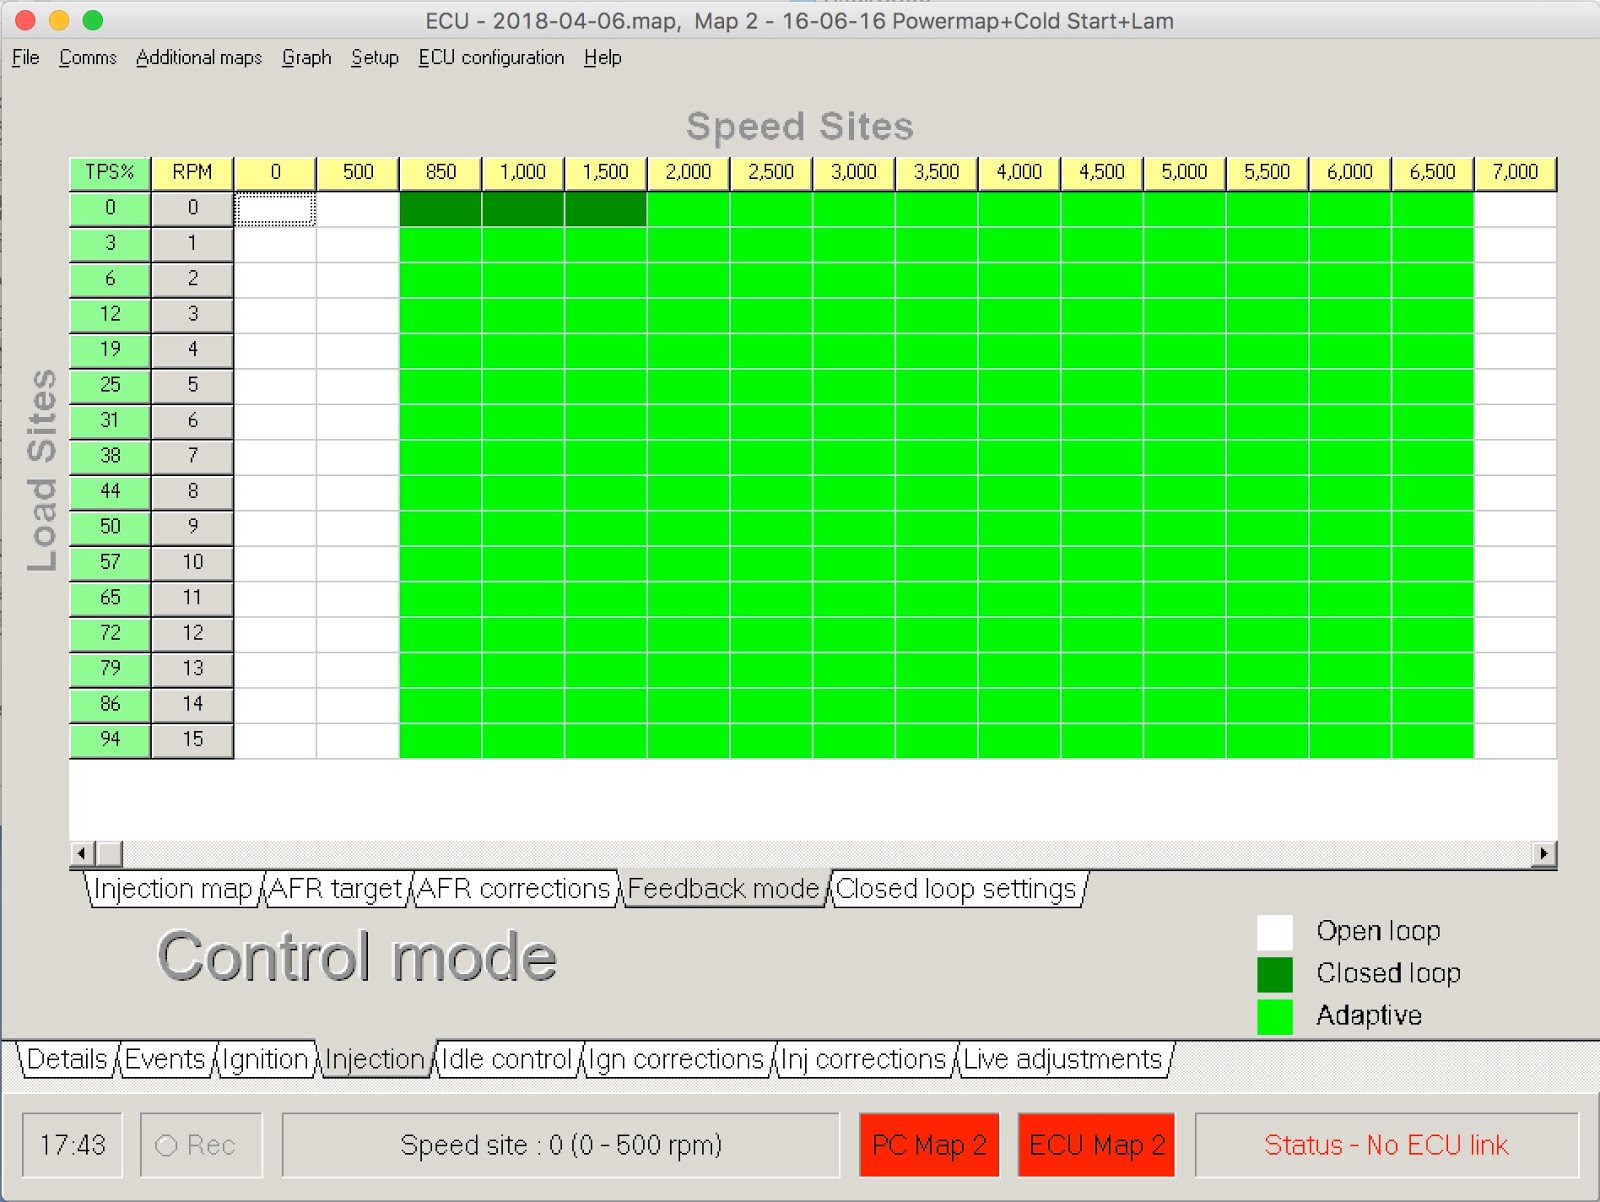
The smoothing mask then applies those changes to the existing injection map while letting me mask out areas like low RPM/Stall catching which I don't want to change and the 2x areas of Idle and Fast idle tested during MOTs which I manage completely manually.

I'm also reducing the smoothing around the edges to help maintain the overall shape of the map.

The neighbour weighting table represents how much each adjacent cell affects the average - I'm setup to smooth more in the direction of acceleration - i.e. diagonally from low TPS/RPM (top left) to high TPS/RPM (bottom right).

Smoothing applied drives all the values in the smoothing mask - so I adjust influence over the entire table until the graph starts to look more progressive before it erodes too much detail - 75% seems like the sweet spot on this cycle.

The slowest step is copying out the current ECU injection map to the spreadsheet - the only way is manual copying.

Top left - current map, Top right - showing weighted differences to neighbours,
Bottom left - the smoothed map, Bottom right - weighted differences on the output.

This example from a second cycle of smoothing so only subtle changes evident - what should be happening is the bottom right differences are overall less than the top right.

Results

The output is a new injection map, table of changes, and a graph of the new map so I can immediately see if it looks right. I can then tweak the various controls to the amount of smoothing I need. Initial results look and drive well though, I'll give it a few more goes -  drive, add in Wideband feedback, smooth, repeat.

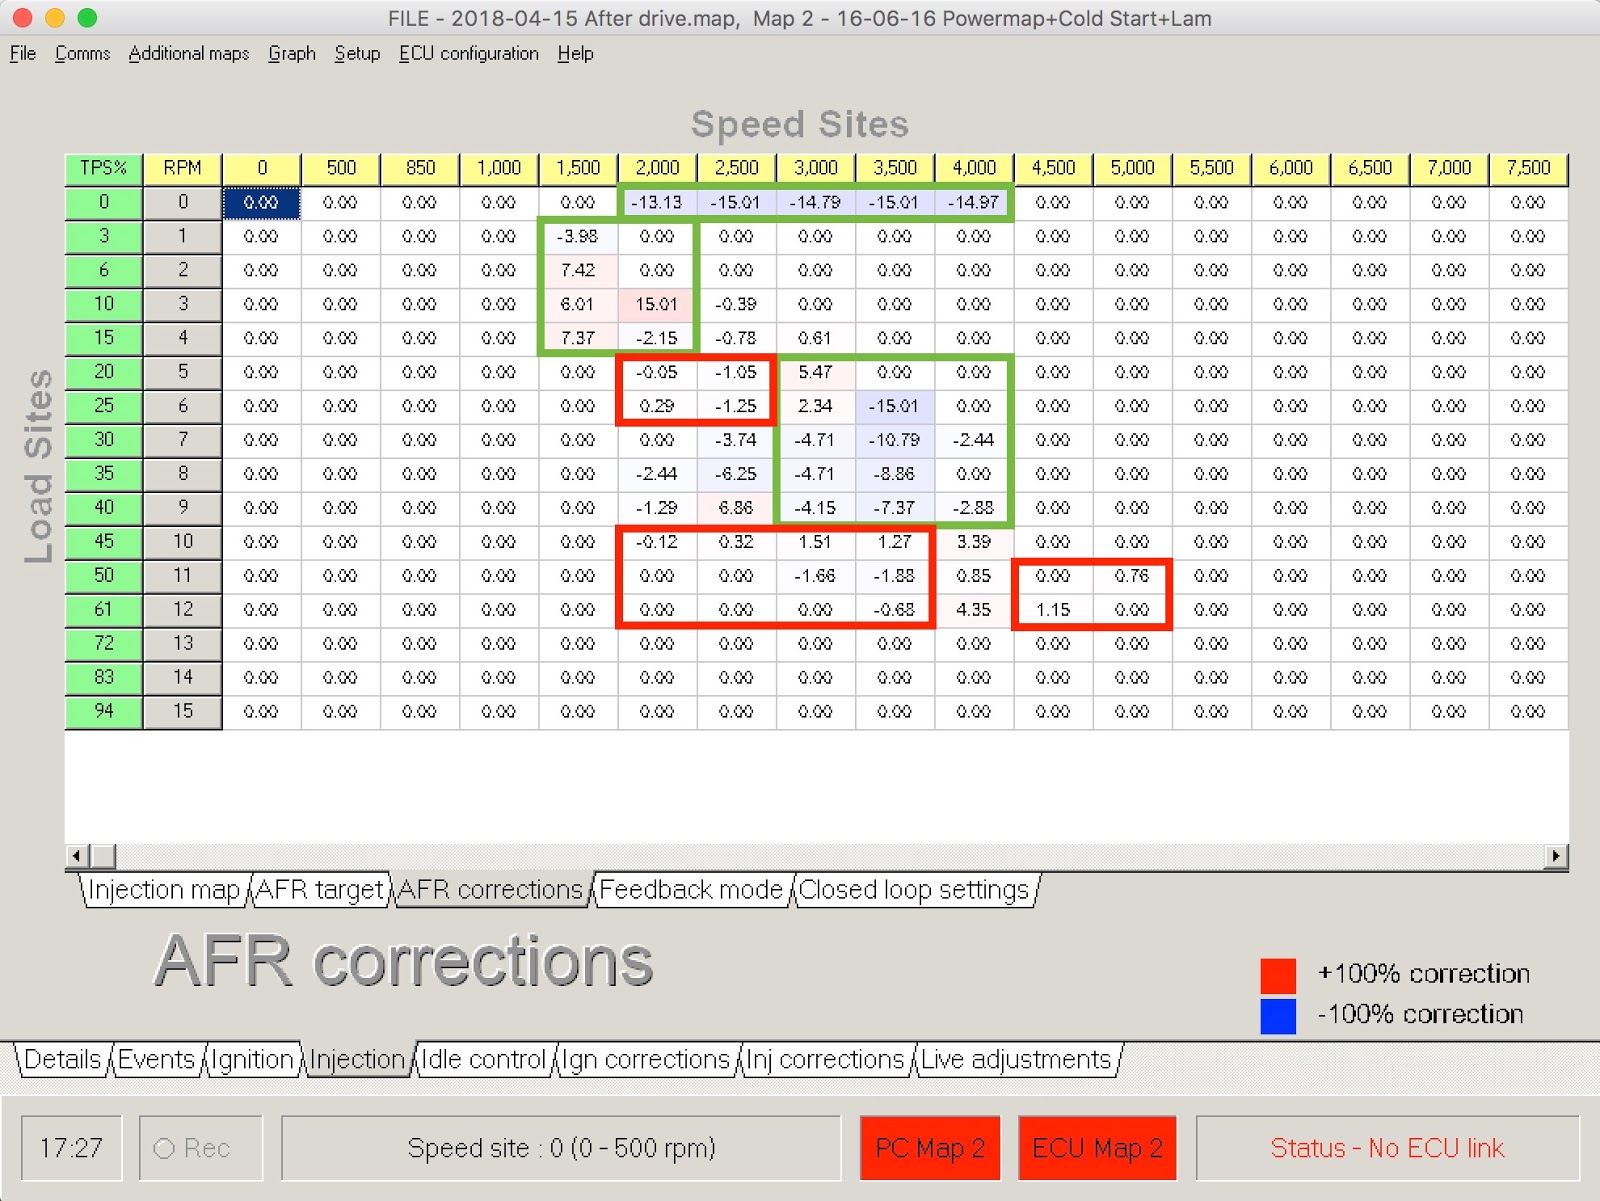
This table showing relative changes, ready to update the ECU map.
Example of the ECU injection map - with just wideband feedback, and then smoothed.

An iterative process - the primary driver on injection is feedback from the Wideband lambda setup, the initial results look good though - a good balance between point adjustments being implemented, smoothed into the map while maintaining the main features.

The smoothing IS destructive - its like weather eroding mountains and filling rivers, but it does seem to counter/help with the issue of limited feedback data points after driving.


Took the car for a drive afterwards - a good 100 miles around Sussex, she still flys and generated another round of Wideband feedback.

...and keep in mind,  I'm just an amateur tweaking/playing, some reading reference, doing what seems reasonable, but certainly nowhere near the kind of knowledge a tuner would have.

Friday 6 April 2018

Accelerator pedal depressor - on the cheap

Time to prepare for this year's MOT at the end of May.

Requirements

I'm happy with the map - but its reasonably new due to the power change re-works and less than perfect battery compensation table. I have to hit the following criteria.

Idle is easy - foot off the accelerator - just tweak the few cells around 1k revs until its in the zone where the wideband can lock it onto the desired fuel ratio.

Fast idle harder - tested anywhere between 2,500 and 3,000 rpm - and requires an extra pair of hands/static right foot to hold the revs rock steady while I adjust the map. Turns out pedal depressors cost on the order of £40 - so thats not happening.

Extra foot

This evening's 7 minute task:
   Some fibreglass poles I'd bought for the roof and never used,
   A block of wood with an 8mm hole,
   A clamp.

Perfect - the wood becomes my third foot...

...the top of the pole clamped to the wheel holding the revs completely static while I play with the injection and AFR maps.

Total cost 7 minutes time and £0 for materials.

Monday 2 April 2018

ECU Battery comp, Lambda and Cold start

Successful ECU tweaking session this morning, major changes listed.

All results documented on the ECU page

Battery compensation

The changes to the power distribution gained me a good 0.5-1.5volts which in turn threw the mixture off, slow idle lost etc. The culprit I believe to be an over eager battery voltage compensation table which was still on default values.

The steepness of this curve was noticably changing the mixture as the idle hovered between generating 13.2 and 14volts, 0.3ms doesn't sound like much but its somewhere on the order of 10% of the total injector duty cycle. I levelled the area betwen 12-14 volts and changed the overall shape.

A new avenue of learning opens up - the curve is directly related to the injector performance and should be documented against each type so my next task is to track down the stock battery compensation curve on a Bosch 0-280-155-820 injector!

Lambda

Some fine adjustment on correction gain and update frequency minimised the overshoot on lambda corrections letting it lock on at slow and fast idle. This was trial and error adjusting gain and frequency independently, slowly, to find the sweet spot of response vs. overshoot. I also checked the calibration on the Spartan2 while I was there - all still spot on.

Raised the coolant temp above setting so it doesn't fight with the cold start injection adjustments.


I smoothed out the areas around the MOT pass points and adjusted to closed loop, I dont want the ECU automatically/permanently adjusting mixture in the idle zone. Fast idle on adaptive until I've done some miles and it learns.

Cold start

Revisited cold start, the curve is the right shape, I just shifted it to last longer by changing the engine turns against each row. She starts without any throttle now ~7-10Âș ambient air temperature.

The curve stays higher longer for the first 120 turns, same as holding a manual choke out for around 8-10 seconds.

...and a new blue temperature driven adjustment keeps the mixture relatively rich until the engine is warm.


Start is good, slow idle is rock solid, just need some more driving to train the map.

Update - 6th April - tweaked battery curve and the target AFRs, needs a run now for everything to settle in.